Quickstart Guide to Enzo
This is the quickstart guide to using Enzo, starting from checking out the Enzo and YT sources, through to building them, then to running an example problem and looking at its output.
Before we get going too far, here are some websites that contain useful information or useful tools:
If you ever get stuck, please email enzo-users. This is not just so that you can get an answer to your question, but also to let the developers know when something is not working or could be more clear in the documentation. Particularly now that Enzo has many interlocking modules, unusual combinations of parameters may require some care, and the individual developers that have created those modules will be able to discuss them with you.
Getting YT
YT was initially developed to allow fast and easy analysis of Enzo output. Since it’s original inception YT has grown to be a powerful tool capable of analysing many different astrophysical simulation code outputs and also non-astro simulation outputs too. To get your hands on YT (which you will need to complete this quickstart tutorial) then go to the YT installation page and install YT locally.
Getting Enzo
The simplest way to get a copy of the current stable source code is to clone the repository using git:
$ git clone https://github.com/enzo-project/enzo-dev
Git (git) is a revision-control system that is available on many platforms (see git-scm.org).
You can then use a pre-existing Makefile (if one exists for your machine) or modify one to point to either the system-wide installation of HDF5 and MPI or to the yt-installed HDF5 and the system-wide MPI. However, since the process of setting up the Makefile can be a bit tricky, it’s discussed in more depth down below.
Setting Up Enzo
Change directories to the Enzo path, and the very first time you enter this directory, execute:
$ cd enzo-dev
$ ./configure
However, you will probably not want to do this multiple times. This wipes out all configuration settings and restores them to defaults; this can lead to unexpected results. It usually only needs to be run once, although in some instances (particularly when using version control) it may need to be run multiple times.
In this directory there are several subdirectories:
- bin This directory is seldom-used.
- doc This directory contains both the older documentation and the newer documentation. The newer documentation is under
manual. Note that the newer documentation is in a format called ReStructured Text, which is converted to HTML to be posted on the website. It can be read in plain text.- input These are files used as input to several problems, including radiative cooling tables. If Enzo fails at startup with a missing file, it is likely in this directory. There are some additional scripts as well.
- run This directory contains example parameter files along with notes about expected output and scripts for plotting. This is also the basis of the Enzo answer test suite, which compares results from one version of the code to results from previous versions of the code.
- src All the Enzo source, along with its affiliated utilities (described below) is contained here.
The source for Enzo, specifically, is contained in
src/enzo. Because the Enzo Makefile is the basis for all other
compilation, we’re going to examine that first.
Change into the src/enzo/ directory, and execute the command
$ ls Make.mach.*
This will come up with a list of potential Makefiles which have been pre-made. If you see one that may be appropriate (for instance, if you’re on a mac, use Make.mach.darwin) you can execute
$ make machine-darwin
For other machines, replace darwin with the final segment of the Makefile name. If you don’t see a Makefile that’s appropriate, you will want to copy one that is close (good starting points are Make.mach.unknown and Make.mach.linux-gnu) to a name that reflects the host you’re on. You can then edit that Makefile, and you will need to set up the appropriate compilation information.
Specifically, despite the fact that there are many variables, for the most part they will be straightforward to set; Make.mach.linux-gnu is a good reference. However, you will need to examine with care the following variables:
- MACH_FFLAGS_INTEGER_32
- MACH_FFLAGS_INTEGER_64
- MACH_FFLAGS_REAL_32
- MACH_FFLAGS_REAL_64
These are the source of many issues with compiling Enzo. Enzo uses a pre-defined bitsize for all compilation and arithmetic; this is done through a #define in the C/C++ code and through Fortran compiler arguments in the Fortran code. This leads to a mismatch: while the C/C++ code will always have the correct bitwidth, the Fortran code must have these variables set properly to ensure the correct bitwidth.
For an example of how to set these with GCC, see the Make.mach.linux- gnu Makefile. For an example of how to set these with the Intel Compiler, see the Make.mach.triton-intel Makefile. For an example of how to set these with the PGI Compiler, see the Make.mach.nics-kraken Makefile.
If your compilation fails on the file acml_st1.F , this is the problem.
Building Enzo
Once you have an Enzo Makefile and have executed the correct make machine-something command, execute:
$ make show-config
This will show the current configuration. make help-config will describe how to turn these options on or off. Some ( python-yes , hypre-yes , a few others) will require external libraries.
The default options for Enzo are mostly fine for beginning, although it defaults to using opt-debug , which typically means using no compiler optimizations. opt-high is supposed to be safe, and opt- aggressive is often faster but less reliable. (For instance, at O3, some compilers are not guaranteed to be deterministic.) When you are satisfied with your configuration options, it is time to build Enzo:
$ make
If this command fails, checking over the output of out.compile may indicate why. If this command fails and the error output does not help to elucidate why, please feel free to email enzo-users-l with the error output and your Make.mach file.
If the compilation succeeds, Enzo will report this to you and a new file named enzo.exe will be created.
Running a Test Problem
We’ll now try running Enzo on a test problem. Copy enzo.exe to the run/Hydro/Hydro-3D/CollapseTestNonCosmological directory, and then change to that directory.
$ cp enzo.exe ../../run/Hydro/Hydro-3D/CollapseTestNonCosmological
$ cd ../../run/Hydro/Hydro-3D/CollapseTestNonCosmological
If you plan on doing Enzo development, you may wish to use ln -s instead of cp to enable faster turnaround.
We’ll now start Enzo using the parameter file in that directory. You can examine that parameter file before beginning, as it is commented. All Enzo parameters are listed and described in the documentation, but it’s also often convenient to simply grep through the source for them.
To execute Enzo, we’re going to tell it the parameter file and supply the -d argument, indicating debug mode.
$ ./enzo.exe -d CollapseTestNonCosmological.enzo
On some machine you may have to execute this using mpirun or in a batch cluster. For the purposes of this bootstrap, we will assume that execution in serial on the current host is acceptable.
This problem will run for a little while, and it will create outputs in the current directory at fixed time intervals. Each output will be self-contained in a directory, matching the pattern DD####/DD#### where #### is a 0-padded, 4 digit counter.
Examining the Output
The first thing to do is to take a slice of the initial conditions. If you have set up the path to yt correctly as indicated by its install script, you should be able to execute this command:
$ yt plot DD0000/DD0000
This will take three slices through the center of the domain along each axis, as sliced through the very first output. The images will be saved to the subdirectory frames. Here is a plot of the outputs that can be expected from the DD0000 snapshots:


Now let’s take a look at DD0010 :
$ yt plot DD0010/DD0010


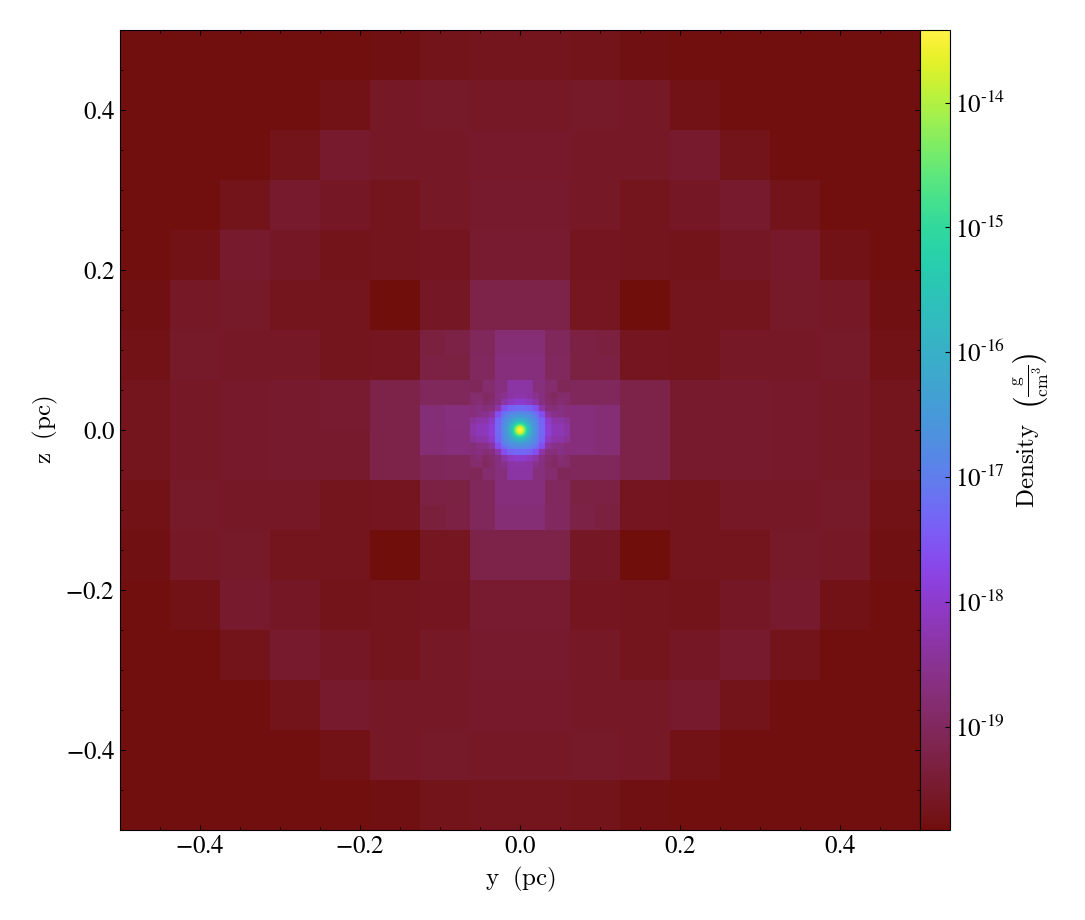
By this point the simulation has not collapsed very far. Feel free to check later outputs (e.g. the yt output from DD0070 shown below)


Another handy command is yt stats, which will describe the current state of the simulation in a couple metrics.
Wrapping Up, Where Else to Go
At this point, you’ve (hopefully!) run an Enzo simulation. You
should also have yt set up.
With luck this has gotten you started. The Enzo documentation contains pointers and cookbook ideas, but the run/ directory also contains many helpful parameter files and plotting scripts. The yt documentation (at yt-project.org) also contains a number of sample recipes for analysis as well as many more complicated examples and documents.
Please feel encouraged to sign up for the enzo-users and the yt mailing lists, and ask any questions there if you have them.
Good luck!
Enzo enjoys the support of numerous universities, funding agencies and labs.